
How to Remove a Photo Background Online (and When Not To)
Removing a background takes a few seconds with an AI model, but the result depends heavily on the photo you start with and on checking the edges afterwards. This guide shows the steps in Pixemon, which model to pick, how to judge the result, and the one situation where you should not use background removal at all: official ID photos.
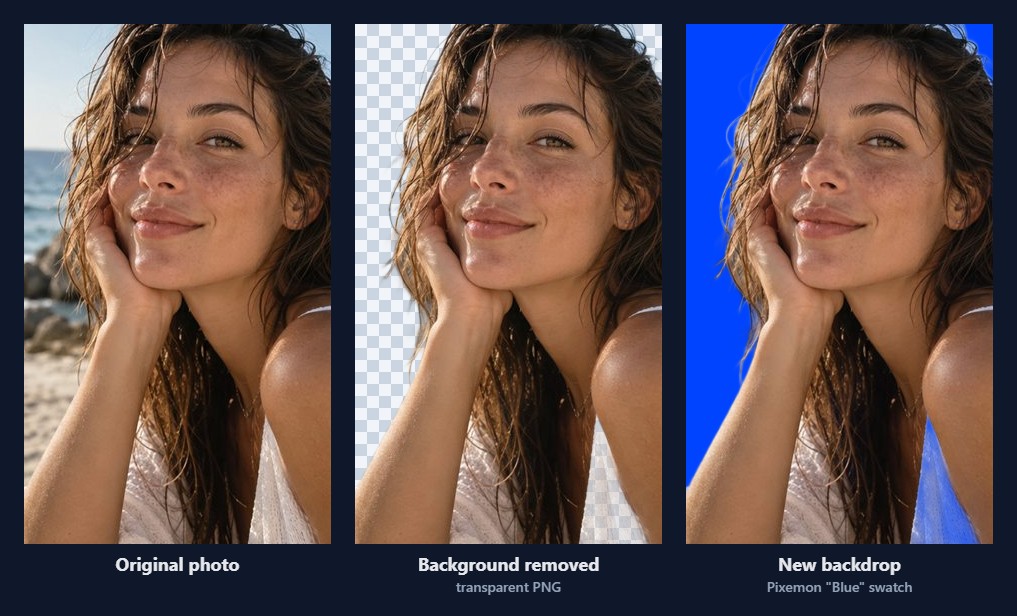
What happens when you press Remove Background
An AI segmentation model looks at every pixel and estimates how likely it is to belong to the subject. Pixemon turns that estimate into a transparency mask: subject pixels stay, background pixels become transparent, and pixels on soft edges such as hair become partly transparent so the outline does not look cut with scissors.
The model runs in your browser. The first time you use a model, the browser downloads it and keeps it for next time, so the first run is slower than later ones. Your photo is processed on your device rather than uploaded to a server for the cut-out.
Step by step in Pixemon
- Open your photo in the Pixemon editor. Use the original file from your camera or phone where possible; screenshots and photos sent through chat apps have fewer pixels and softer edges.
- Choose the AI model. On a computer the model menu is in the tools panel; on a phone, swipe the tool cards to Remove background.
- Press Remove Background (AI) and wait for the progress bar to finish. The removed areas show as a grey and white checkerboard.
- Check the edges at full size, especially hair, hands, glasses, and thin or see-through clothing (more on this below).
- Choose what goes behind the subject, or save it with a transparent background.
Which model should you choose?
Pixemon offers three background-removal models. They trade download size against detail:
| Model | Download | Best for |
|---|---|---|
| AI Model A (default) | Fetched on first use | General photos of people, pets, and objects |
| Studio HD AI | About 40 MB | Portraits where hair and soft edges matter |
| Fast Portrait | About 2.8 MB | A quick result on a slow connection; simpler photos |
When we tested the close-up portrait above, Studio HD separated individual strands of hair from the sea and sand behind them. Fast Portrait, on the same photo, removed only part of the background. If the first result is not clean, try another model before spending time on manual fixes. You can also load your own compatible model file from your computer with Load from Disk (.onnx).
Photos that cut out cleanly
The model has to decide where the subject ends. You can make that decision easier before you take the photo:
- Contrast between subject and background. Dark hair against a pale wall, or a light shirt against a darker background, gives a clear outline. A white shirt against a white wall does not.
- Space behind the subject. Standing a metre or more away from the wall softens the background and reduces shadows that can be mistaken for part of the subject.
- Soft, even light. Harsh flash creates hard shadows and bright edges; light from a window or overcast daylight gives smoother outlines.
- A simple background. Busy patterns, foliage, and crowds near the subject's outline are the hardest cases.
- Enough pixels. Fine detail such as hair needs resolution. A small or heavily compressed image gives the model less to work with.
Transparent PNG or a new backdrop?
After the cut-out you have two choices.
Keep it transparent
Choose PNG when you save a cut-out: PNG keeps transparency, while JPG fills transparent areas with white. A transparent cut-out is the right choice when you will place the subject on something else later: a slide, a poster, a product listing template, or a Pixemon collage.
Replace the background
Under Replace background there are three options:
- Solid: one-tap White, Cream, Blue, Red, or Gray backdrops.
- Color pick: any colour you choose.
- Image: one of your own photos behind the subject.
For plain studio backdrops that the AI handles poorly, the Chroma key fallback lets you sample the background colour with the eyedropper and remove pixels close to it instead.
Check the edges before you use the result
Look at the result at full size, not just as a thumbnail. These are the places where cut-outs usually go wrong:
- Thin or see-through materials. Light fabric, lace, and veils are partly transparent in reality, so the new backdrop can show through them, as in the figure above.
- Hair against a similar colour. Blonde hair against a pale sky, or dark hair against a dark room, can lose strands or keep a halo of the old background.
- Glasses and reflections. Bright reflections in lenses can be read as background.
- Hands and objects at the edge of the frame. Fingers holding a cup or a phone can be clipped.
- Colour spill. Green grass or a coloured wall can tint the edges of hair and shoulders. This is most visible on a contrasting new backdrop.
If an edge is wrong, try another model, retake the photo with more separation from the background, or choose a backdrop colour close to the original so small errors are less visible.
Do not use background removal on official ID photos
It is tempting to fix a passport or visa photo by swapping the background for plain white. Most authorities do not allow it. The US Department of State tells applicants not to digitally alter passport photos, and Canada's guidance excludes altered photos. Replacing a background is an alteration, even when the result looks natural.
If an official photo needs a plain background, take a new photo against a plain wall or use a photographer. Pixemon's passport print layouts are for arranging an unaltered photo on a print sheet; see our passport photo size guide for official sources.
Using the cut-out in a layout
Once you are happy with the result, you can place it straight into a Pixemon collage or print layout without leaving the editor. A transparent subject on a soft-coloured backdrop often works better in a collage than the original busy background, because it keeps attention on the person.
Common questions
Why is the first background removal slow?
The browser is downloading the model. Later runs use the saved copy and start much faster.
Will I lose quality?
The subject keeps the pixels of your original photo. Saving as PNG avoids adding compression artefacts.
Can I remove the background from a product photo?
Yes. Objects with clear edges on a contrasting surface usually cut out well. Shiny or transparent products, such as glass bottles, are harder and need careful checking.
Try it with your own photo
Open a photo in Pixemon, choose a model, and press Remove Background. The processing happens in your browser.
Open the background removerRelated guides: passport photo sizes and official sources and fixing photo colour and brightness.