
HSV Colour Maths Explained: Hue, Saturation and Value
Every pixel on your screen is stored as three numbers: how much red, green and blue light to mix. That is perfect for a screen and awkward for a person. Ask "what is RGB 230, 120, 50?" and few people can picture it. Ask "an orange, fairly strong, quite bright" and everyone can. HSV is the maths that translates between the two. This guide works through the formulas with real numbers, so you can see exactly what happens when you move a hue or saturation slider.
The three parts of HSV
- Hue is the kind of colour, given as an angle around a colour wheel from 0° to 360°: red at 0°, yellow at 60°, green at 120°, cyan at 180°, blue at 240° and magenta at 300°, then back to red.
- Saturation is how strong the colour is, from 0% (grey, no colour at all) to 100% (as vivid as that hue gets).
- Value is how bright the colour is, from 0% (black) to 100% (the brightest version of that colour). Some programs call it brightness, so HSB and HSV are the same thing.
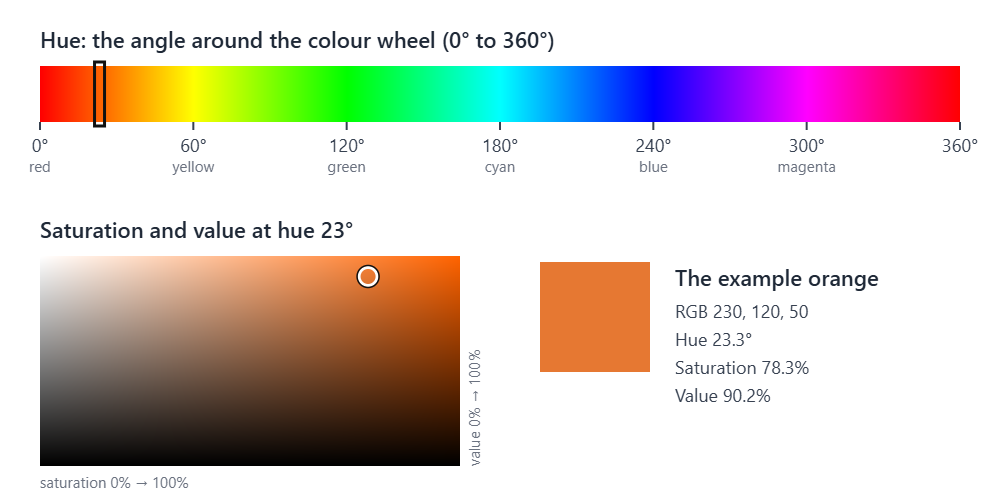
Step 1: scale RGB to between 0 and 1
Images usually store each channel as a whole number from 0 to 255. The formulas are simpler with fractions, so divide each channel by 255. We will follow one orange through every step:
- R = 230 ÷ 255 = 0.902
- G = 120 ÷ 255 = 0.471
- B = 50 ÷ 255 = 0.196
Step 2: RGB to HSV
Three in-between numbers do most of the work:
- max, the largest channel: 0.902 (red)
- min, the smallest channel: 0.196 (blue)
- chroma, the difference between them: 0.902 − 0.196 = 0.706
Value
Value is simply the largest channel:
V = max = 0.902, or 90.2%.
Saturation
Saturation is the chroma as a share of the value. If every channel is equal, chroma is zero and the colour is a grey:
S = chroma ÷ max = 0.706 ÷ 0.902 = 0.783, or 78.3%. (If max is 0, the colour is black and S is 0.)
Hue
Hue depends on which channel is the largest. Each formula places the colour within a 120° section of the wheel centred on that channel's primary colour:
| Largest channel | Hue formula |
|---|---|
| Red | H = 60 × ((G − B) ÷ chroma), then add 360 if negative |
| Green | H = 60 × ((B − R) ÷ chroma + 2) |
| Blue | H = 60 × ((R − G) ÷ chroma + 4) |
Red is the largest channel in our orange, so:
H = 60 × ((0.471 − 0.196) ÷ 0.706) = 60 × 0.389 = 23.3°
That puts it between red (0°) and yellow (60°), a little closer to red, which is what orange is. The finished result is HSV 23.3°, 78.3%, 90.2%.
When chroma is zero (white, black and every grey) the hue formulas would divide by zero. These colours have no hue, and programs simply call it 0°. This is why changing the hue of a photo leaves its greys, whites and blacks untouched.
More examples
| Colour | RGB | Hue | Saturation | Value |
|---|---|---|---|---|
| Pure red | 255, 0, 0 | 0° | 100% | 100% |
| Mid grey | 128, 128, 128 | none (0°) | 0% | 50.2% |
| Orange | 230, 120, 50 | 23.3° | 78.3% | 90.2% |
| Royal blue | 40, 90, 200 | 221.2° | 80.0% | 78.4% |
Step 3: change the colour
Once a colour is in HSV, edits that are hard in RGB become simple arithmetic:
- Shift the hue: add degrees and wrap around past 360. Our orange plus 120° is 143.3°, a green.
- Mute the colour: lower the saturation. Halving it to 39.2% gives RGB 230, 175, 140, a soft peach.
- Darken it: lower the value. The hue and saturation stay the same, so the colour does not drift.
Step 4: HSV back to RGB
To display the result, convert back. Take the hue-shifted orange: H = 143.3°, S = 0.783, V = 0.902.
- Chroma:
C = V × S = 0.902 × 0.783 = 0.706 - Second-largest component:
X = C × (1 − |(H ÷ 60) mod 2 − 1|). H ÷ 60 = 2.389; mod 2 gives 0.389; minus 1 gives −0.611; its absolute value is 0.611; so X = 0.706 × 0.389 = 0.275. - Lift:
m = V − C = 0.902 − 0.706 = 0.196, the amount added to every channel at the end. - Choose the section of the wheel: the hue decides which channel gets C, which gets X and which gets 0.
| Hue | (R, G, B) before adding m |
|---|---|
| 0° to 60° | (C, X, 0) |
| 60° to 120° | (X, C, 0) |
| 120° to 180° | (0, C, X) |
| 180° to 240° | (0, X, C) |
| 240° to 300° | (X, 0, C) |
| 300° to 360° | (C, 0, X) |
143.3° is in the 120° to 180° section, so the result is (0, 0.706, 0.275). Adding m to each gives (0.196, 0.902, 0.471). Multiplying by 255 and rounding gives RGB 50, 230, 120, a bright green.
Notice something neat: the original orange was 230, 120, 50, and the green is the same three numbers in a different order. A hue shift of exactly 120° moves each channel's job to the next one, because red, green and blue sit 120° apart on the wheel.
The same maths in code
Here are both conversions in JavaScript, taking and returning values between 0 and 1 (hue in degrees):
function rgbToHsv(r, g, b) {
  const max = Math.max(r, g, b), min = Math.min(r, g, b);
  const c = max - min;
  let h = 0;
  if (c !== 0) {
    if (max === r) h = 60 * (((g - b) / c + 6) % 6);
    else if (max === g) h = 60 * ((b - r) / c + 2);
    else h = 60 * ((r - g) / c + 4);
  }
  return { h, s: max === 0 ? 0 : c / max, v: max };
}

function hsvToRgb(h, s, v) {
  const c = v * s;
  const x = c * (1 - Math.abs((h / 60) % 2 - 1));
  const m = v - c;
  const [r, g, b] =
    h < 60  ? [c, x, 0] : h < 120 ? [x, c, 0] :
    h < 180 ? [0, c, x] : h < 240 ? [0, x, c] :
    h < 300 ? [x, 0, c] : [c, 0, x];
  return { r: r + m, g: g + m, b: b + m };
}
The + 6 and % 6 in the red case do the "add 360 if negative" step, so a reddish-magenta gets a hue just below 360° rather than a negative one.
HSV and HSL: close cousins
HSL (hue, saturation, lightness) uses the same hue but measures brightness differently:
- Lightness:
L = (max + min) ÷ 2, the average of the largest and smallest channels. - Saturation:
S = chroma ÷ (1 − |2L − 1|)
The practical difference is at the top of the scale. In HSV, 100% value is the purest, brightest version of the colour. In HSL, 100% lightness is always white, and the purest colour sits at 50%. The royal blue from the table is HSV 221°, 80%, 78% but HSL 221°, 67%, 47%: the same colour described two ways.
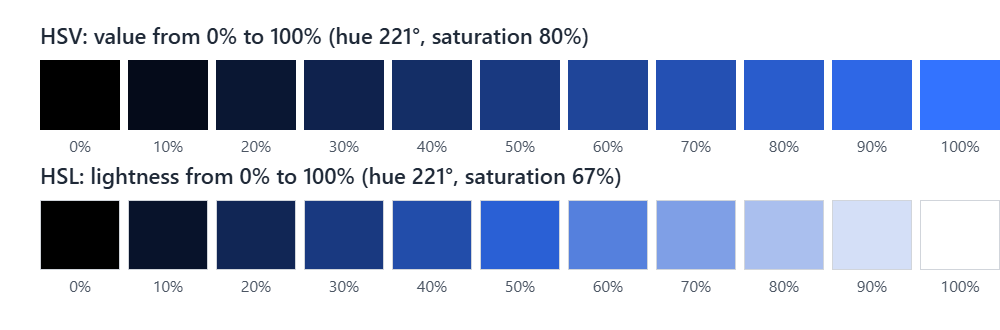
That is why colour pickers often use HSV, a square that runs from grey to the full colour, while adjustment sliders often use HSL, where raising lightness can take a colour all the way to white.
How Pixemon uses this maths
The background colour picker uses HSV
When you choose a custom background colour, the strip sets the hue and the square sets saturation (left to right) and value (bottom to top), exactly as in the first diagram. Pixemon converts your choice to RGB with the HSV formulas above.
The HSV adjustment panel works in HSL
Pixemon's HSV panel has Hue, Saturation and Brightness sliders. Despite the name, its maths uses HSL, so that the Brightness slider can lighten all the way to white. For every pixel, it converts RGB to HSL, then:
- Hue adds the slider's degrees (−180° to +180°) and wraps around the wheel.
- Saturation adds the slider value ÷ 100 to S, so +30 adds 0.30, and keeps the result between 0 and 1.
- Brightness adds the slider value ÷ 100 to lightness, the same way.
It then converts back to RGB. Fully transparent pixels, such as a removed background, are skipped.
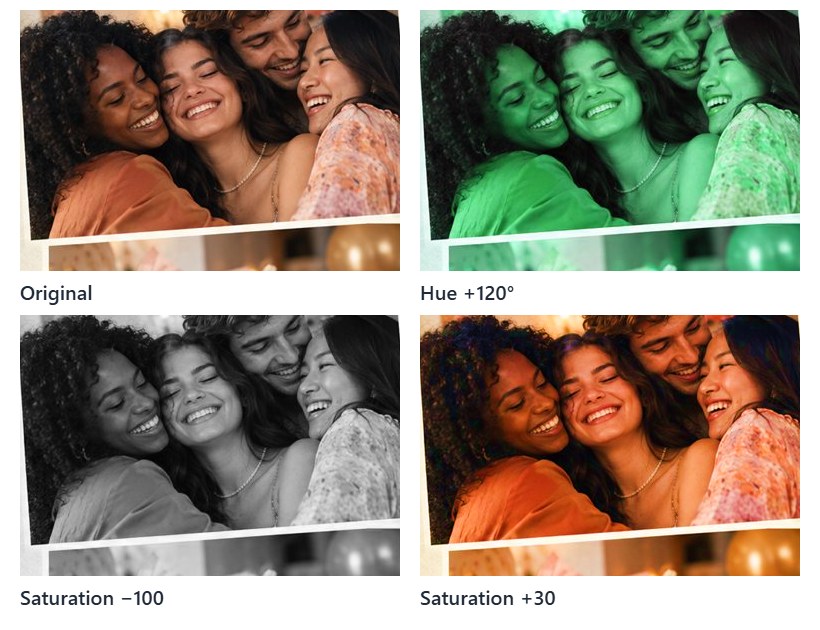
Saturation −100 versus the B&W button
Taking saturation to −100 leaves each pixel at its HSL lightness, the average of its brightest and darkest channel. Pixemon's B&W filter uses a different formula: 0.299 × R + 0.587 × G + 0.114 × B. That weighting matches how bright each colour looks to the eye: green looks much brighter than blue at the same strength. Pure blue (0, 0, 255) becomes grey 128 with −100 saturation but a much darker 29 with the B&W filter, which matches how dark blue looks to the eye. For a black and white photo, the B&W button is usually the better choice; see our colour and brightness guide.
Things the maths does not tell you
- Equal value does not mean equal brightness. Pure yellow and pure blue both have 100% value, but yellow looks far brighter. HSV is a convenient description, not a model of human vision.
- Hue is unstable in dark and grey pixels. When chroma is tiny, a one-step change in a channel can swing the hue a long way, which is why big saturation boosts can bring out coloured noise in shadows.
- Skin is narrow. Most skin tones sit in a small range of orange hues, roughly 10° to 40°. Even a 10° to 15° hue shift can make people look ill, so use hue for creative effects or objects, and the yellow, magenta and cyan controls for gentle correction.
- Results are rounded. Converting back to whole numbers from 0 to 255 rounds each channel, so going to HSV and back can shift a colour by one step.
Common questions
Is HSB the same as HSV?
Yes. "Brightness" and "value" are two names for the same number: the largest of the three channels.
Why does a hue shift not change white or grey areas?
Because they have no hue. Their channels are equal, so chroma and saturation are zero, and turning the hue changes nothing.
Why does +100 saturation look so harsh?
Pixemon's saturation slider adds to each pixel's existing saturation, and +100 adds 1.0, the whole range. Every pixel with even a trace of colour therefore jumps to full saturation, including nearly grey areas and noise in the shadows. Small amounts, such as +10 to +30, strengthen colour while keeping the differences between pixels.
Try the sliders on your own photo
Open a photo in Pixemon, choose HSV, and move Hue, Saturation and Brightness to see the maths at work.
Open the Pixemon editorRelated guides: fixing photo colour and brightness and why prints look darker than the screen.