
Why Do My Prints Look Darker Than My Screen?
It is one of the most common printing complaints: the photo looked bright and lively on your phone, and the print came back dull and dark. Usually nothing is wrong with the printer. A screen and a sheet of paper show light in very different ways, and a photo edited on a bright screen is often too dark for paper. Here is why it happens and how to prepare a photo so the print looks the way you expected.
The main reason: screens give off light, paper reflects it
A screen is a light source. A phone or laptop is usually set bright enough to be read in daylight, so every pixel glows. Paper gives off no light of its own: you see only the room light it reflects back, and even the whitest photo paper reflects less light than a bright screen gives off. Ink then absorbs more of that light in the darker areas.
So the same picture covers a much smaller range from black to white on paper than on screen. The mid-tones, such as faces, skin, and clothing, are where the difference shows most. Shadows that looked dark grey with visible detail on screen can print as almost black.
Other causes that make it worse
- Screen brightness turned up. If you edited with the screen at full brightness, you probably darkened the photo to compensate without realising it.
- Dim viewing light. A print looked at in a dim room really is darker. Judge prints in good daylight or a well-lit room.
- Matte paper. Matte finishes look softer and less contrasty than glossy ones; deep blacks look a little grey and the whole print can feel flatter.
- Printer "enhancements". Automatic correction in a printer driver or lab can change brightness and colour. If prints vary, turn it off and judge the result from your own file.
- Ink spreading on paper. On ordinary paper, ink spreads slightly into the fibres, so dark tones grow darker. Proper photo paper reduces this.
Check before you print
- Turn your screen brightness down to about half, or to a level that is comfortable in your room, before judging or editing a photo for print.
- Look at the shadows. If you have to look closely to see detail in hair, dark clothing, or the background, it will probably be lost on paper.
- Make one small test print before printing a batch or a large size, and look at it in good light next to the screen.
The fix: lift the mid-tones, not everything
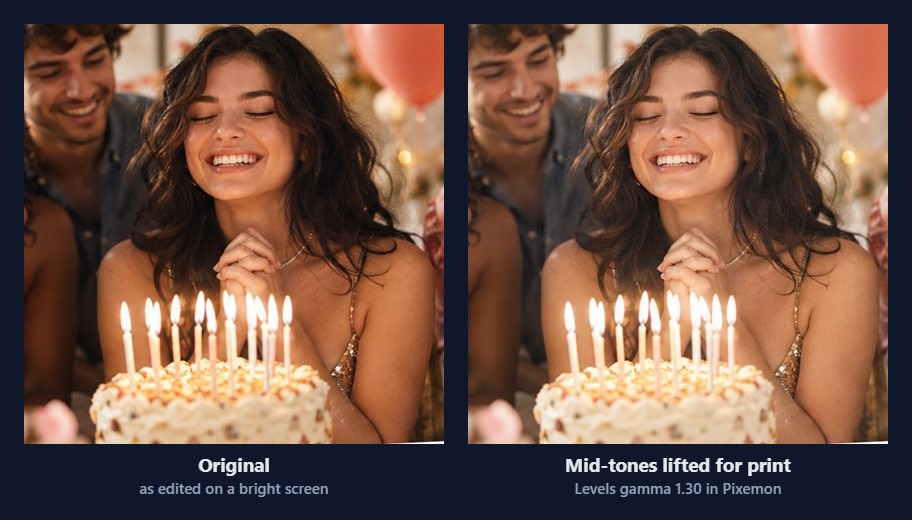
The obvious fix is the Brightness control, but it has a drawback. Pixemon's Brightness adds the same amount to every pixel, including black, so blacks turn grey and the photo looks washed out. For printing, the better tool is Levels.
In Levels, the middle handle, gamma, brightens the mid-tones while leaving pure black and pure white where they are. Faces and clothing get lighter, but the photo keeps its depth.
How much to brighten
There is no single correct number, because papers, printers, and viewing light differ. As a starting point, a gamma between about 1.1 and 1.3 suits many photos edited on a bright screen. Make a test print, compare it with the screen in good light, and adjust from there. Write down the value that works for your printer and paper, and you can reuse it.
Keep the original
Save the brightened version as a separate file for printing. The original still looks right on screens and for sharing online.
What about colours that print differently?
Colour differences have similar causes: screen settings, paper, ink, and automatic correction. Very bright, saturated colours on screen, especially vivid blues, greens, and oranges, often cannot be reproduced exactly by ink and come out duller. Small differences are normal. Large ones, such as an overall green or magenta tint on every print, usually point to a printer setting or ink problem rather than the photo. Our colour and brightness guide explains how to correct a colour cast in the photo itself.
A quick checklist
- I judged the photo with my screen at a moderate brightness.
- I can see detail in the shadows without looking hard.
- I brightened mid-tones with Levels gamma, not just Brightness.
- I turned off automatic enhancement in the printer settings, or asked the lab to.
- I made one test print and looked at it in good light.
Prepare a photo for print
Open a photo in Pixemon, open Levels, and drag the middle handle to brighten the mid-tones before printing.
Open the Pixemon editorRelated guides: where to print your photos and how many pixels a print needs.